This tutorial series goes through the basic steps needed to create a cliff based level for Half-Life. Additionally it will cover many of TG's basic tools, generation and texturing features as well as how to plan your level to insure it performs well in Half-Life.
First off we need to create some starting terrain. To do this we first need to access the 'New Terrain' form in TG. From the 'File' menu select 'New'. For this tutorial I chose to use a setting of 48 triangles along the X and Y axis with a triangle size of 160 units. This will produce a large +/-3840 unit level which is just inside the +/-4096 hard-coded Half-Life limit. Your screen should look something like this:
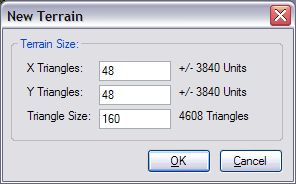
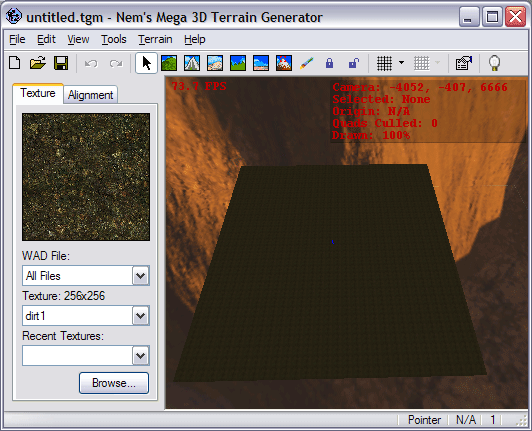
Now it is important to note that increasing the size of each triangle and decreasing the number of triangles along each axis will reduce r_speeds and compile times, so feel free to experiment with these values as I have chosen a very detailed terrain. Other configurations such as 40/40/192 and 30/30/256 will all result in the same sized terrain with the latter containing approximately 40% of the triangles. Once you are happy with your setting hit 'OK', you should now be staring at some terrain:
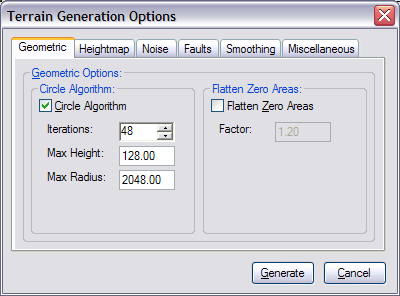
Next we are going to add some generated features to the terrain. From the 'Terrain' menu select 'Generate'. Under the 'Geometric' tab check the 'Circle Algorithm' and fill in the below settings, this will produce some mild bumpy features on the terrain.
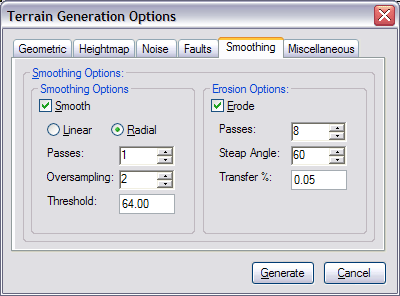
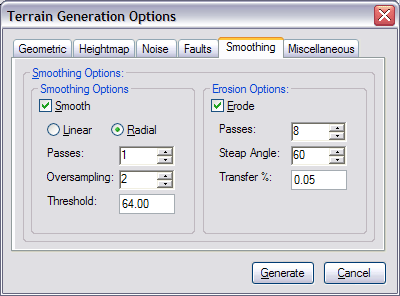
We next want to smooth these features down to be less obtrusive. To do this we will use both the 'Smooth' and 'Erode' options under the 'Smoothing' tab. Your settings should look something like:
Finally, since this is random terrain, we will probably want to try the generation features a couple of times until we get one that most suits are needs, to do this we will need to reset the terrain from generation to generation. Under the 'Miscellaneous' tab select the 'Reset' option and give it a value of 0:
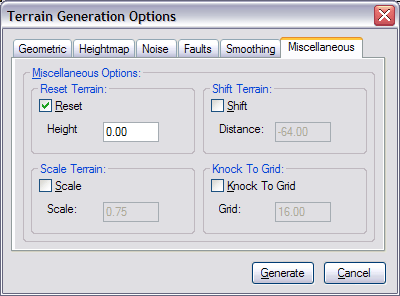
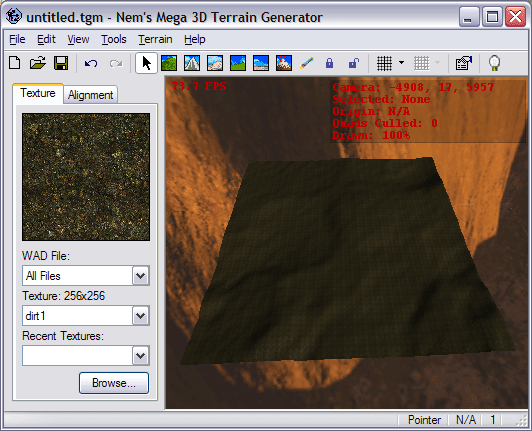
Now that we have everything set up all we have to do is press the 'Generate' button. This will close the 'Terrain Generation Features' form and generate our settings on the terrain. The end result we are looking for is shown below, basically a flat yet uneven landscape. If you are not happy with the result all you have to do is select 'Regenerate' from the 'Terrain' menu and a new set of features will be generated. Feel free to experiment with the settings until you're happy with your starting terrain. Here is what my terrain currently looks like:
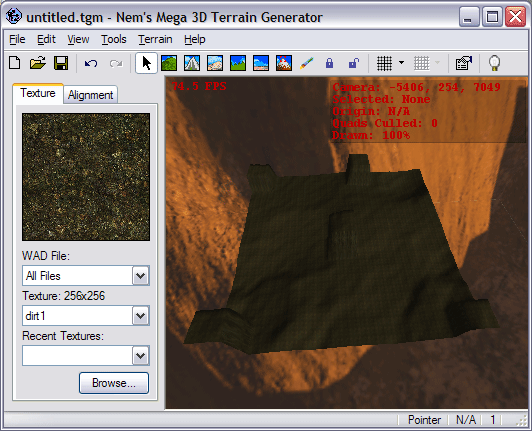
Next we are going to add some height variations to our terrain to build the cliffs off of. Select 'Raise/Lower' from the 'Tools' menu and drag four or five sections of the terrain up 1000-2000 units. Your end result should look something like (I know it looks silly):
We are about to perform some pretty severe alterations to our terrain so it might be a good idea to back it up first, in the 'Edit' menu select 'Push Revert'. This will save a copy of your terrain on TG's Undo/Redo stack which you can pop back up at any time (restoring your terrain back to the state it was in when you pushed it on the stack (phew)).
Next lets create some cliffs. Grab the 'Flatten' tool from the 'Tools' menu and position it so its selection is on top of one of the chunks of terrain we raised with the 'Raise/Lower' tool. Now press and hold your left mouse button and drag your selection outlining any paths you want to create in your terrain. If you're confused check the below picture and you should be able to figure out what I mean. If you screw up you can always select 'Undo' from the 'Edit' menu, or if there aren't enough undo states to undo what you've done, just pop the revert state back with the 'Pop Revert' button. Your end result should look something like:
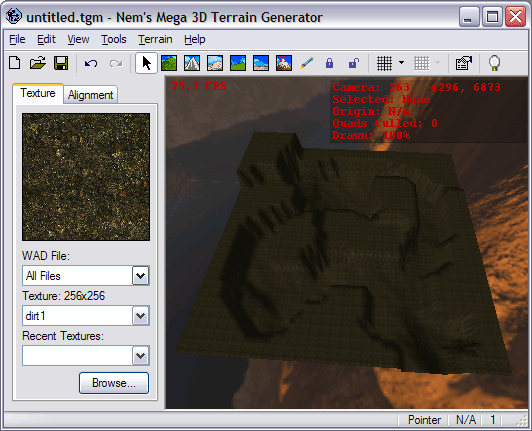
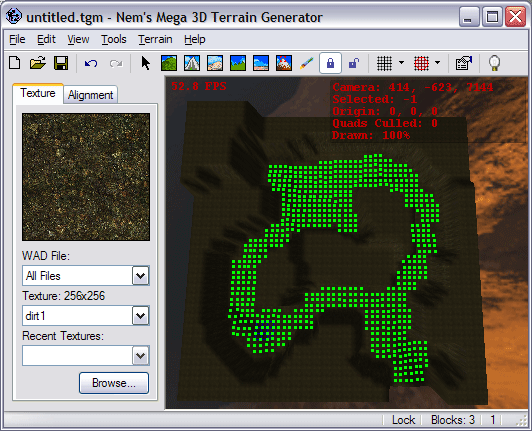
Now we've got some nice smooth paths running through some horrible blocky terrain. Let's remedy that shall we? What we basically want to do is smooth the cliff portion of our terrain without touching our paths (the terrain in between the cliffs). From the 'Tools' menu select the 'Lock' tool. Next proceed to drag this tool along the paths of your terrain highlighting all the vertices you want to lock in green. If you lock anything you didn't want to you can either press 'Undo' or use the 'Unlock' tool. Your paths should be highlighted as shown below:
To complete our cliffs out were going to perform some erosion and smoothing on them via the 'Terrain Generation Options' form (from the 'Terrain' menu select 'Generate'). First make sure nothing we don't want to run is checked, right click anywhere on the form and select 'Uncheck All Options' (or just go through each tab unchecking everything as you go). Next fill out the 'Smoothing' tab to look something like:
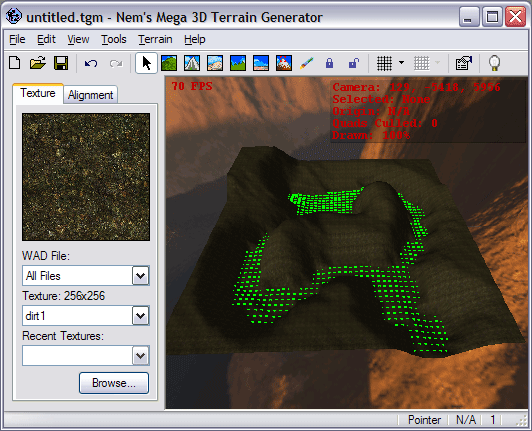
Finally hit the 'Generate' button and your cliffs should appear all smooth without affecting your paths. Here is what my terrain currently looks like:
From here you may continue to modify your terrain until you have it exactly as you want it. If you wish to unlock all the locked vertices you can accomplish this by selecting 'Tools' then 'Locking' then 'Unlock All Points'. Once you are happy with your terrain head on over to the next page and we'll discus how to texture it.
hej
Well... you guys did a wonderful work with this tutorials... they couldn't be more explained than this..
I just got a problem... I made my terrain, following all your instructions and it worked... the problem is that when i select TEXTURE, from the TOOLS MENU, nothing is avaiable there (cant click on anything)..
What did i do Wrong?
I wanna make a CS map
Tks!!!
I got it... just had to choose a WAD file in the PACKAGE menu!
U guys r the best =]
im kinda new to all this [n00b big time and yes i admit it] and i cant get my camera to change i can strafe side to side turn and go forward or backwards but ive tried everything to look Down or up and it wont....... also i cant get the background pics like the sky and that which just looking at a bit of map in the pitch black is kinda..... depressing plus it would give me a chance to see what kinda backgrounds would work well with me terrain
need help
most appreciated
thanx
ok i was stupid obviously i didnt do everything as i found out how to look down [ stupid right mouse button] so thats that sorted i still dont know how to put in the sky/background tho
and ideas
thanx again
'How to move' is also explained in the FAQ...
Anyways, to set the background pictures go to your 'Tools->Options' form, from there head over to the 'Textures' tab and use the six fields (Up, Down, Right, Left, Front and Back) to allow you to set the six different sky textures.
I'm having trouble in Windows XP adding a WAD package - it stops responding after about 5 minutes. Please help if you can!
If it is the Half-Life.wad or some other massive WAD don't bother trying to load it. TG wasn't really ment to handle them (though 5 minutes seems a litle high).
Next lets create some cliffs. Grab the 'Flatten'
I cant get it like that, when I use flattern tool it only make it flat not cliffs like that =/
ok.. i have everything right expect this textures... i tryed to get a wad picture file but it displays none in the package menu.. i also tryed to get sky texture but they diisplayed none eaither i am running on windows xp is that a problem how can i get these texturez???!!?!? plz help
Windows xp here. Any help would be much appreciated.
One of my priority projects is a rewrite of Terrain Generator (i.e. v4) to add full Source support and interoperability and to improve the rendering engine to support larger terrains.
Weird is somthing that is realy hard to generate controled square is a very easy shape to generate and makes it less of a chalange to make all the tools compatiple so i guess you just have lear :)
InVaDeR the dirt1 is in the half-life wad that is in the half-life gcf
thers some decent textures in the othere games's gecf files also check google and wadfather
If you find your terrain's scale is wrong, you can always resize it in TG (under the Terrain menu).
plz help me
Is that possible? or not with this tool?
Is that possible? or not with this tool?
Yes just make the wall as a floor first, rotate it X or Y 90 degrees and theres your wall with diagonal indentations on vertical or roughed up cliffs